-
Under Moonlit Skies

Being an empath, during full moons my emotions tend to rise to the surface, making me edgy and so strained I usually cannot focus on anything. However, the energies of last Sunday's full moon inspired me loads of things including this tut made with GIMP which I'm gradually getting to grips with whenever inspiration strikes me.
Materials
- a contrasted scenery with a clear open sky
GIMP 2.10 (free and open source for Linux/Windows/OSX)
G'MIC 2.74 (if you're using GIMP for Linux/Windows)
Instructions
1. Load a copy of your original in GIMP and resize if necessary.
2. Add new layer and fill with customised linear gradient using blue (#394f65) and white.
3. Duplicate gradient layer. Set blend modes to HSL Colour for the original and Multiply for the copy.
4. Merge visible layers.
5. Apply Colours - Shadows-Highlights to enhance shadows:
- Shadows = 72
- Shadows colour adjustment = 34
- Highlights = 0
- Highlights colour adjustment = 50
- White point adjustment = 0
- Radius= 100
- Compress = 506. Via Filters menu, apply G'MIC - Colours - Colour Presets:
- Category = Eric Ellerbrock
- Preset = Avalanche
- Strength = 56
- Hue = 12,6
- Saturation = - 28.77. Apply G'MIC - Details - Equalize Local Histogram:
- Strength = 51,9
- Other settings left as default8. Apply G'MIC - Lights & Shadows - Light Glow:
- Density = 47,4
- Other settings left as default9. Apply Colours - Hue-Saturation selecting blue colour to decrease luminosity (-22,3 %).
10. Copy-paste moon graphic as new layer. Resize to adjust to the main picture and arrange on the lighter area of the sky. Set blend mode to Hard light and lower opacity to 70%.
11. Merge visible layers and export as you desired file format.
NOTE: Right after step 8, I've smudged the darker areas of the sky to the right so as to colourise the overexposed spots and also retouched the light splashes on the cliff to darken them for a more even appearance.
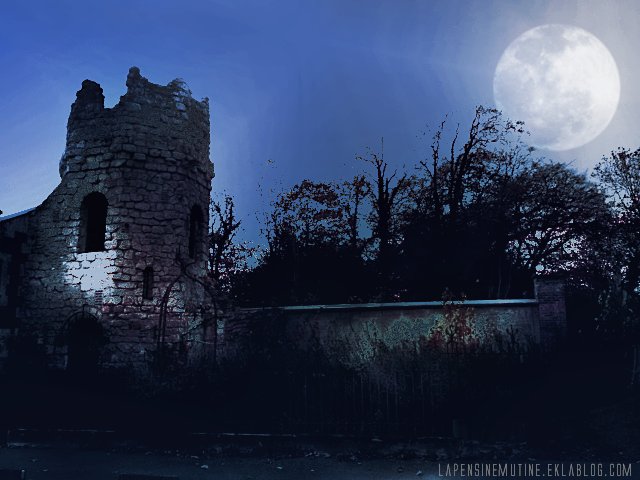
For this second example (using a picture of a ruined tower in my home town), I have used many more steps and I won't give you setting details for each image having its own characteristics, you'll need to take these tuts as inspirational ground rather than follow them thoroughly (unless you want to train on my originals).
On a new layer, I have applied Render - Noise - Difference clouds filter and set blend mode to Dodge. On a second new layer, applied Autumn Change gradient (Overlay blend mode with 55% opacity) and its copy (Grain extract blend mode with 38% opacity). After merging visible layers, applied filters G'MIC - Colors - Color Blindness (Protanoptia) followed by G'MIC - Colors - Color Presets (Others - Cinematic) and G'MIC - Lights & Shadows - Pop Shadows (maximum strength). Applied Colours - Hue-Saturation twice. First to change global hue then to turn each basic colour to a blue hue. Ended up with more filters G'MIC - Colors - Mixer (YCbCr) and G'MIC - Colors - Simulate Film (Slide color - Fuji FP 100C).
Please, keep in mind these are only guidelines for the type of manipulations you'll have to apply to your pictures and of course, the values used here are only for the purpose of these particular examples as every picture is different. It's up to you to experiment and make full use of your creativity using my examples as a focal point.
May inspiration be with you!
Ey@el
Related articles
Reproduction of the above contents is strictly prohibited.
© lapensinemutine.eklablog.com. All rights reserved. Tags: graphics, photo, download, eyael, gimp
-
Comments
Thought repository for cluttered mind


