-
How To Turn Your Photos Into Cartoons

It's been a long time since I last posted a photo editing tut — one year precisely. The main reason has been lack of time, lack of inspiration, and also lack of motivation — due to lack of feedback. Well, I'm addressing that today not because I felt I had to do it, but mostly because an opportunity occurred and I thought it would be nice to share my recent experiments with you. The following manipulation won't yield good results with all your pictures though — you may want to avoid dark and/or detailed images — and you will probably need to edit them all a lot after so as to get a clean fake hand-drawn output.
Materials
- a clear contrasted photo
GIMP 2.10.14 (Linux/Windows/OSX)
G'MIC 2.91 (Linux/Windows)
MyPaint Brushes For GIMP (collection of brushes)
DigitalStrip (font)
Pack PNG Comic Text (comics sounds)
PNG Pack #17 (comics bubbles)
PNG Pack #18(comics bubbles & sounds)
Instructions
1. Load a copy of your original in GIMP and resize if necessary.
2. Enhance edges with Filters - Enhancement - Sharpen :
- Range = 3
- Quantity = 3,650
- Threshold = 0
- Crop = Adjust3. Push b/w contrast with Colors - Exposure :
- Black level = 0,100
- Exposure = 0,4354. Apply Filters - G'MIC-Qt - Artistic - Cartoon :
- Smoothness = 3,45
- Sharpening = 186
- Edge Threshold = 30
- Edge Thickness = 0,026
- Color Strength = 1,368
- Color Quantization = 2565. Apply Filters - G'MIC-Qt - Colors - Color Balance with default settings.
6. Apply Filters - G'MIC-Qt - Colors - Color Presets :
- LUTs Pack = Creative Pack
- Preset = Crisp Warm
- Strength = 100
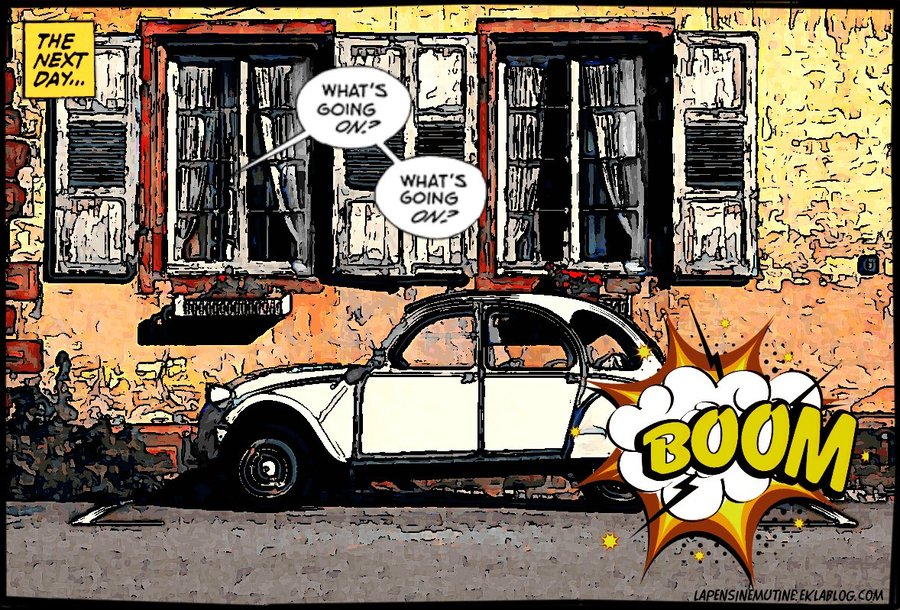
- Other settings left as default7. Copy-past your chosen comic bubbles and sounds as new layers then adjust sizes and layout.
8. Add a new layer and using MyPaint 002 Frame Line brush, draw an irregular border around the picture. TIP: To draw a full line, click on your starting point and holding the Shift key, click again on the ending point, making sure there's a slight offset. Then fill up the offset.
NOTE: I have also changed the colour of the 'Boom' with a variety of filters from the Colors menu plus some cosmetic editing such as removing blue stains with saturation and exposure tweaks. If you wish to edit out the caption of bubbles, you may select the inside with freehand tool and fill up with the original colour, then enter your own text with the same font I have used (or any other).

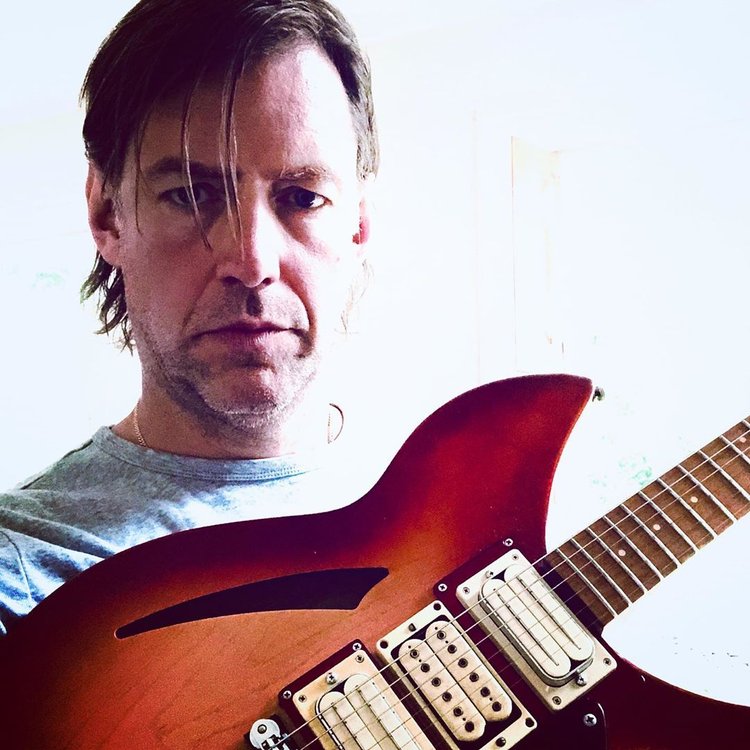
For my second example using a portrait, after 'cartooning' my character (and editing out the output with various brushes), I removed the white background around him and outlined him with the pencil tool, completing with a drop shadow to create some depth. Finally, I added a cartoon city background I found on the web (I could also have 'cartooned' one) which I copy-pasted as a new layer below. After merging, I applied G'MIC - Colors - Color Blindness filter with Blindness Type = Deuteranomaly.
As always, it is not possible to give you any precise guidelines because every picture needs different settings (and some won't be 'cartoonable'). Also, it all depends on the style you wish to create. At any rate, I do hope it made you feel like trying and why not create a whole comic strip with your existing photos (or take new ones in view of creating a story). I must say I'm thrilled at the prospect. That is if time permits...
Ey@el
Related articles
Reproduction of the above contents is strictly prohibited.
© lapensinemutine.eklablog.com. All rights reserved. Tags: tutorial, photo, graphics, cartoon, comics, eyael
-
Comments
Thought repository for cluttered mind
-

My name is Eyael and I'm pleased to welcome you in my Pensieve. For an optimal brow-sing experience, here are some tools to effectively navigate:♦ Sitemap
♦ Ad blocker
♦ Newsletter
♦ RSS feedA quick word in my guestbook would also make me very happy!
You may also follow me on my social media:

Thank you,

STATISTICS
Online since: 06/08/2013
Articles 1320
Total visitors: 130567
Today: 67
Connected : 1