-
Apply grunge effects to your pictures
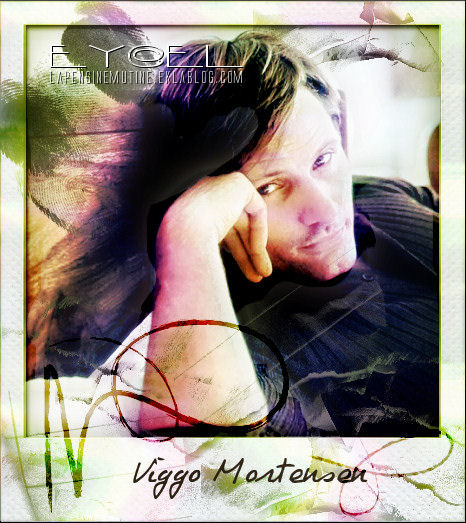
This is based on a Photoshop tutorial I had adapted (changing a lot of things) for Paint Shop Pro, thus you also should be able to use it with any other image editing software. Newbies may find it a bit difficult though, as a basic knowledge of layers, blend modes, and how to use brushes is essential (nothing really tough here). Since the page of the original tutorial is no longer available, I take the liberty of reposting here the free downloadable material (Polaroid frame).
Materials
- a photo
- grunge style brushes (on DeviantArt according to your chosen image program)
- a script fontInstructions
1. Open a copy of the picture you wish to manipulate and apply the necessary corrections and desired enhancement.
For the above example, I added a bit of blue to midtones and highlights, slightly desaturated the overall colours, denoised and increased contrast with an external filter that can differentiate between light and dark areas (UnPlugged Split Contrast). To soften my image, I duplicated the original layer then apply Gaussian blur to the copy (radius 3), set blend mode to Screen, lowered opacity to 40%, and finally merged layers. Then I applied Photo-Plugins Soft Focus with Soft Light mode, but this is optional and depends both on your source picture and on the effect you wish to produce. The possibilities are about as endless as the number of external filters available is.2. Open a copy of the Polaroid frame and paste your altered image as a new layer under the frame layer. Resize if necessary so that it is correctly framed.
3. Add a new layer on top (above the frame) and apply brushes. I have used four different scratches and a fingerprint in black colour.4. Add a new layer (always on top) and fill with the fractal pattern. Apply Motion Blur (angle 270°, strength 100%). Increase luminosity to 40%, lower layer opacity to 50% and set blend mode to Overlay.
5. Duplicate the fractal layer and change duplicate layers settings to opacity 70% and blend mode Lighten.
6. Activate frame layer and select transparent centre using the Magic Wand. Then activate top layer and click Delete to erase the central area. Unselect.7. Add your desired text on a new layer (I used the Philing font).
8. Add a new layer on top and apply more brushes (two scribbles) with colour black and setting blend mode to Burn.
NOTE: These are only the general lines to follow as depending on which picture, which fractal and which brushes you use, layer opacities and blend modes may need to differ. The purpose of this tutorial is to inspire you not to copy which is not fun nor rewarding.Ey@el
Reproduction of the above contents is strictly prohibited.
© lapensinemutine.eklablog.com. All rights reserved. Tags: graphics, tutorial, download, eyael
-
Comments
Thought repository for cluttered mind
-

My name is Eyael and I'm pleased to welcome you in my Pensieve. For an optimal brow-sing experience, here are some tools to effectively navigate:♦ Sitemap
♦ Ad blocker
♦ Newsletter
♦ RSS feedA quick word in my guestbook would also make me very happy!
You may also follow me on my social media:

Thank you,

STATISTICS
Online since: 06/08/2013
Articles 1319
Total visitors: 130435
Today: 135
Connected : 1
